How to Combine and Make Drawer and Bottom Tab Navigators Visible on Every Screen in React Native

Hi, 👋🏿 I'm Taofiq, I design and build web and mobile applications
Introduction
Navigation is one of the important aspects of a mobile app these days as nearly almost all the app we use today either have Drawer Navigator or a Bottom Tab Navigator where we can then move in between the screens of both navigators. Also having different screens on our mobile app is handled by the React Navigation with the help of the Stack Navigator. The addition of these navigatiors to a react native app is acheived by using the React Navigation Library. When building react native apps, we sometimes need to create only one navigator to work with such as for Instagram, only the Bottom Tab Navigator is required to build this app and transition between the screens. However, there are some cases where we are presented with the challenge of combining multiple types of navigator in the app we are building. Say for example, we need to combine drawer and bottom tab and need to make the bottom tab navigator to display even when we click any of the drawer route.
The React Navigation Library does is not designed in such a way that this functionality can be achieved directly.
In this tutorial, we will be using the Bottom Tab, Drawer and Stack Navigators to cover two use cases:
- A simple use case where we can use the
Bottom Tab Navigatorin a single Drawer route. - A complex flow where the
Bottom Tab Barwill be visible and accessible inside our Drawer Routes.
Let's get into it!
Installing Dependencies
In this tutorial, we will be using Expo CLI to set up our development environment by initiating the command:
expo init combineNavs
Select the blank template to get the expo app up and running.

Now, let's install all the dependencies that we will be needing for this project:
yarn add @react-navigation/native @react-navigation/native-stack @react-navigation/stack
expo install react-native-screens react-native-safe-area-context
For the BottomTab Navigator
yarn add @react-navigation/bottom-tabs
For the Drawer Navigator
yarn add @react-navigation/drawer
expo install react-native-gesture-handler react-native-reanimated
Finally, add this code to the App.js of your app to complete the installation of the react-native-gesture-handler.
NB: This code should be at the top of the App.js file and nothing else should be before it.
According to the official documentation:
If you are building for Android or iOS, do not skip this step, or your app may crash in production even if it works fine in development. This is not applicable to other platforms.
import 'react-native-gesture-handler';
File Structure
When building mobile apps it is important to consider a more readable file structure, so as the code gets complicated it can easily be separated and save refactoring in the process. So before setting up our file structure we need to understand what we want to build and how the flow looks like, this will allow us to have an easy set up. To make the file structure easy, we will have 2 folders: navigator and screens. The navigator will hold everything regarding the Drawer and BottomTab Navigators while the screens folder will contain all the screens for the Drawer and BottomTab Screen. This way we can easily separate our navigators from the screens we are rendering.
So, as previously mentioned, the navigator folder will hold both the navigator files while the screens used in this files will be imported from the respective folders from the screen folder. Finally the Drawer Navigator is imported to the index.js which is then used inside the App.js file.
Drawer Navigators and Screens
The drawer navigator will contain three (3) different routes created in the DrawerTabScreens: Home Navigator.js, SettingsNavigator.js, PrivacyNavigator.js
The HomeNavigator.js will be created as follows:
import { StyleSheet, Text, View } from "react-native";
import React from "react";
import { createStackNavigator } from "@react-navigation/stack";

const Stack = createStackNavigator();

const Home = () => (
  <View style={styles.container}>
    <Text>Home</Text>
  </View>
);

const HomeNavigator = () => {
  return (
    <Stack.Navigator
      screenOptions={{
        headerShown: false,
      }}
    >
      <Stack.Screen name="HomeScreen" component={Home} />
    </Stack.Navigator>
  );
};

export default HomeNavigator;

const styles = StyleSheet.create({
  container: {
    flex: 1,
    backgroundColor: "#fff",
    alignItems: "center",
    justifyContent: "center",
  },
});
The other 2 Routes (Settings and Privacy) will be created in a similar way with their respective names. You can get the code for the other two screens from my github gist here.
Now that we have defined the screens for our drawer tab, we can create the drawer navigator as follows:
import React from "react";
import { createDrawerNavigator } from "@react-navigation/drawer";
import HomeNavigator from "../screens/DrawerTabScreens/HomeNavigator";
import SettingsNavigator from "../screens/DrawerTabScreens/SettingsNavigator";
import PrivacyNavigator from "../screens/DrawerTabScreens/PrivacyNavigator";

const Drawer = createDrawerNavigator();
const DrawerNavigator = () => {
  return (
    <Drawer.Navigator useLegacyImplementation>
      <Drawer.Screen
        name="HomeNavigator"
        component={HomeNavigator}
        options={{
          title: "Home",
        }}
      />
      <Drawer.Screen
        name="SettingsNavigator"
        component={SettingsNavigator}
        options={{
          title: "Settings",
        }}
      />
      <Drawer.Screen
        name="PrivacyNavigator"
        component={PrivacyNavigator}
        options={{
          title: "Privacy",
        }}
      />
    </Drawer.Navigator>
  );
};
export default DrawerNavigator;
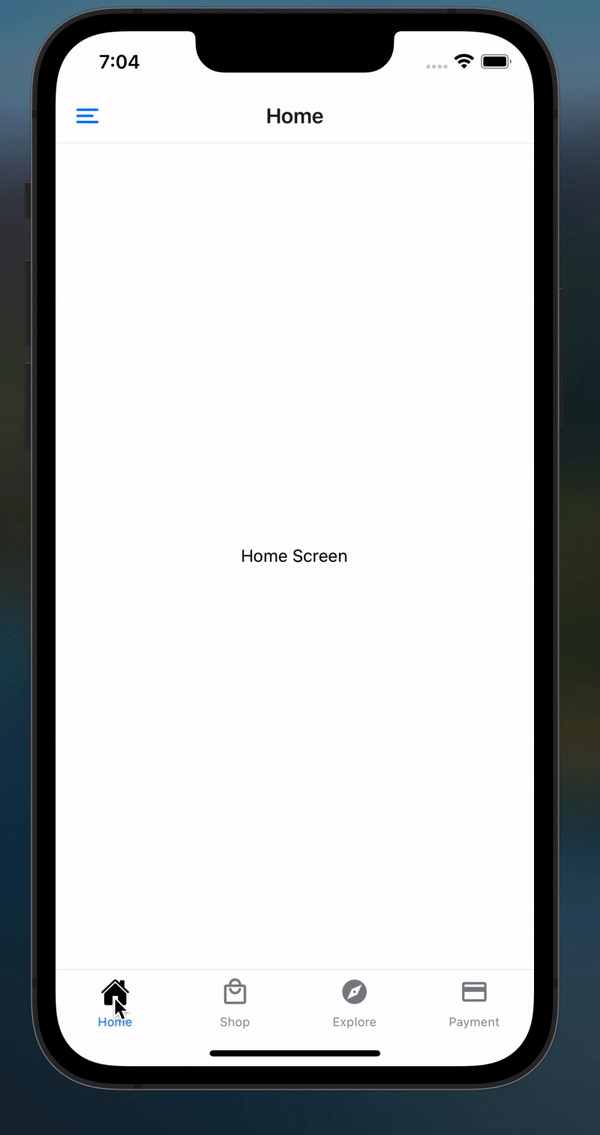
Now let's check what we have in our Simulator.
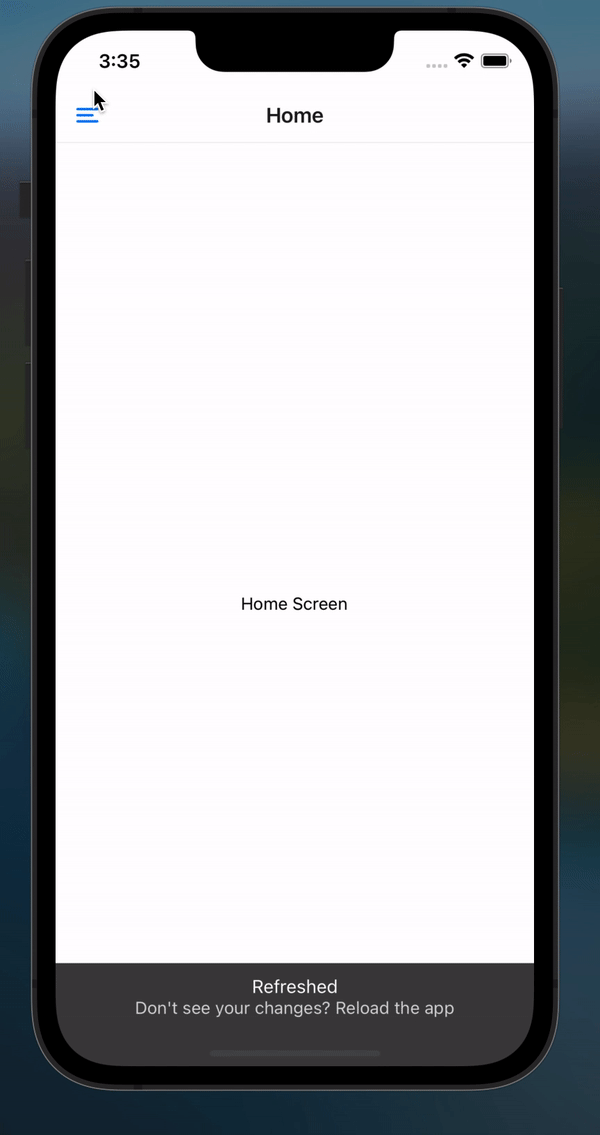
BottomTab Navigators and Screens
Now that we have implemented our Drawer Navigator routes, it's time to implement the bottom tab navigator. Our BottomTabNavigator will have 4 different screens : HomeNavigator, ShopNavigator, PaymentNavigator, ExploreNavigator. We have created the Home Navigator previously, so we will proceed to create the ShopNavigator as follow:
import { StyleSheet, Text, View } from "react-native";
import React from "react";
import { createStackNavigator } from "@react-navigation/stack";

const Stack = createStackNavigator();

const Shop = () => (
  <View style={styles.container}>
    <Text>Shop</Text>
  </View>
);

const ShopNavigator = () => {
  return (
    <Stack.Navigator
      screenOptions={{
        headerShown: false,
      }}
    >
      <Stack.Screen name="Shop" component={Shop} />
    </Stack.Navigator>
  );
};

export default ShopNavigator;

const styles = StyleSheet.create({
  container: {
    flex: 1,
    backgroundColor: "#fff",
    alignItems: "center",
    justifyContent: "center",
  },
});
The other two screens (ExploreNavigator and PaymentNavigator) can be found in my gist here.
Now, we can create our BottomTabNavigator:
import React from "react";
import { createBottomTabNavigator } from "@react-navigation/bottom-tabs";
import HomeNavigator from "../screens/DrawerTabScreens/HomeNavigator";
import ShopNavigator from "../screens/BottomTabScreens/Shop";
import PaymentNavigator from "../screens/BottomTabScreens/Payment";
import ExploreNavigator from "../screens/BottomTabScreens/Explore";

const Tab = createBottomTabNavigator();

const BottomTabNavigator = () => {
  return (
    <Tab.Navigator
      screenOptions={{
        headerShown: false,
      }}
    >
      <Tab.Screen name="HomeNavigator" component={HomeNavigator} />
      <Tab.Screen name="ShopNavigator" component={ShopNavigator} />
      <Tab.Screen name="ExploreNavigator" component={ExploreNavigator} />
      <Tab.Screen name="PaymentNavigator" component={PaymentNavigator} />
    </Tab.Navigator>
  );
};

export default BottomTabNavigator;
In our BottomTabNavigator, the HomeNavigator is our first screen which we have already included in the DrawerNavigator. In the HomeNavigator there's an Home screen, hence the inital screen route that will be rendered in the bottom tab navigator is the home screen. Since we are combining the navigators and we need to show the home screen when a user is on the home route in the drawer navigation, we can then replace the HomeNavigator component in the drawer navigation with the BottomNavigatior component as a whole.
Let's replace the HomeNavigator component with the BottomTabNavigator component we just created and see what we have:
DrawerNavigation.js
const DrawerNavigator = () => {
  return (
    <Drawer.Navigator useLegacyImplementation>
      <Drawer.Screen
        name="HomeTabs"
        component={BottomTabNavigator}
        options={{
          title: "Home",
        }}
      />
      <Drawer.Screen
        name="SettingsNavigator"
        component={SettingsNavigator}
        options={{
          title: "Settings",
        }}
      />
      <Drawer.Screen
        name="PrivacyNavigator"
        component={PrivacyNavigator}
        options={{
          title: "Privacy",
        }}
      />
    </Drawer.Navigator>
  );
};
export default DrawerNavigator;
Now we have implemented both the DrawerTab and the BottomTab Navigators, it's time to add icons and some other styles to our BottomTab Navigator and it's screens.
BottomTab Navigator.js
const BottomTabNavigator = () => {
  return (
    <Tab.Navigator
      screenOptions={{
        headerShown: false,
        tabBarStyle: {
          backgroundColor: "lavender",
          paddingTop: 5,
        },
      }}
    >
      <Tab.Screen
        name="HomeNavigator"
        component={HomeNavigator}
        options={{
          tabBarLabel: ({ focused }) => (
            <Text style={{ color: focused ? "black" : "#7F8487" }}>Home</Text>
          ),
          tabBarIcon: ({ size, focused }) => (
            <Ionicons
              name="ios-home"
              size={size}
              color={focused ? "black" : "#7F8487"}
            />
          ),
        }}
      />
      <Tab.Screen
        name="ShopNavigator"
        component={ShopNavigator}
        options={{
          tabBarLabel: ({ focused }) => (
            <Text style={{ color: focused ? "black" : "#7F8487" }}>Shop</Text>
          ),
          tabBarIcon: ({ size, focused }) => (
            <MaterialCommunityIcons
              name="shopping-outline"
              size={size}
              color={focused ? "black" : "#7F8487"}
            />
          ),
        }}
      />
      <Tab.Screen
        name="ExploreNavigator"
        component={ExploreNavigator}
        options={{
          tabBarLabel: ({ focused }) => (
            <Text style={{ color: focused ? "black" : "#7F8487" }}>
              Explore
            </Text>
          ),
          tabBarIcon: ({ size, focused }) => (
            <MaterialIcons
              name="explore"
              size={size}
              color={focused ? "black" : "#7F8487"}
            />
          ),
        }}
      />
      <Tab.Screen
        name="PaymentNavigator"
        component={PaymentNavigator}
        options={{
          tabBarLabel: ({ focused }) => (
            <Text style={{ color: focused ? "black" : "#7F8487" }}>
              Payment
            </Text>
          ),
          tabBarIcon: ({ size, focused }) => (
            <MaterialIcons
              name="payment"
              size={size}
              color={focused ? "black" : "#7F8487"}
            />
          ),
        }}
      />
    </Tab.Navigator>
  );
};
The icons used were gotten from expo-vector-icons.
screenOptions - "Options to configure how the screens inside the group get presented in the navigator. It accepts either an object or a function returning an object".
tabBarLabel - "Title string of a tab displayed in the tab bar or a function that given { focused: boolean, color: string } returns a React.Node, to display in tab bar." In our case it returns the 'home, shop, explore, payment' in our bottomtab nav.
The tabBarIcon receives the focused and size property. The focus property can be used to highlight the current route while the size can be used to set the icon size.
You can read up on other props for the tab navigator and screens on the official docs.
Now, let's see what we have:
Combining the Navigators
So a recap of all we have implemented: we started by implementing the drawer routes for the drawer navigator, then proceed to implement the drawer navigator itself, then we implemented the bottom tab navigator and combine the bottom tab nav with the drawer navigation. Then we added styles and icons to our bottom navigation bar. But one thing to notice is that the bottom tab bar disappears once we click on the settings screen.
Why? When working with navigations in react-native, the navigation interface of the child navigator only appears in the screens which it contains. Meaning, the BottomTab nav will only show when we are on the home route only and not in any other routes. So the only ideal way to solve this issue is for the BottomTab Navigator to contain all the screens (including the screens for the drawer navigator).
The BottomTab Navigator will house all the screens for the application, therefore the only screen that will be left in the DrawerNavigator.js is the BottomTab Navigator while we will still render the SettingsNavigator and PrivacyNavigator.
We will create a new ScreenRoutes file where we will create a configuration object for each of our screens which we will then store in a routes array.
ScreenRoutes
import { Ionicons } from "@expo/vector-icons";
import { MaterialCommunityIcons } from "@expo/vector-icons";
import { MaterialIcons } from "@expo/vector-icons";

export const screens = {
  HomeTabs: "HomeTabs",
  Home: "Home",
  HomeNavigator: "HomeNavigator",
  Shop: "Shop",
  ShopNavigator: "ShopNavigator",
  Explore: "Explore",
  ExploreNavigator: "ExploreNavigator",
  Payment: "Payment",
  PaymentNavigator: "PaymentNavigator",
  Settings: "Settings",
  SettingsNavigator: "SettingsNavigator",
  Privacy: "Privacy",
  PrivacyNavigator: "PrivacyNavigator",
};

export const routes = [
  {
    name: screens.HomeTabs,
    focusedRoute: screens.HomeTabs,
    title: "Home",
    showInTab: false,
    showInDrawer: false,
    icon: (focused) => (
      <Ionicons
        name="ios-home"
        size={24}
        color={focused ? "black" : "#7F8487"}
      />
    ),
  },
  {
    name: screens.HomeNavigator,
    focusedRoute: screens.HomeNavigator,
    title: "Home",
    showInTab: true,
    showInDrawer: true,
    icon: (focused) => (
      <Ionicons
        name="ios-home"
        size={24}
        color={focused ? "black" : "#7F8487"}
      />
    ),
  },
  {
    name: screens.Home,
    focusedRoute: screens.HomeNav,
    title: "Home",
    showInTab: true,
    showInDrawer: false,
    icon: (focused) => (
      <Ionicons
        name="ios-home"
        size={24}
        color={focused ? "black" : "#7F8487"}
      />
    ),
  },
  {
    name: screens.Shop,
    focusedRoute: screens.ShopNavigator,
    title: "Shop",
    showInTab: true,
    showInDrawer: false,
    icon: (focused) => (
      <MaterialCommunityIcons
        name="shopping-outline"
        size={24}
        color={focused ? "black" : "#7F8487"}
      />
    ),
  },
  {
    name: screens.ShopNavigator,
    focusedRoute: screens.ShopNavigator,
    title: "Shop",
    showInTab: true,
    showInDrawer: false,
    icon: (focused) => (
      <MaterialCommunityIcons
        name="shopping-outline"
        size={24}
        color={focused ? "black" : "#7F8487"}
      />
    ),
  },
  {
    name: screens.Explore,
    focusedRoute: screens.ExploreNavigator,
    title: "Explore",
    showInTab: true,
    showInDrawer: false,
    icon: (focused) => (
      <MaterialIcons
        name="explore"
        size={24}
        color={focused ? "black" : "#7F8487"}
      />
    ),
  },
  {
    name: screens.ExploreNavigator,
    focusedRoute: screens.ExploreNavigator,
    title: "Explore",
    showInTab: true,
    showInDrawer: false,
    icon: (focused) => (
      <MaterialIcons
        name="explore"
        size={24}
        color={focused ? "black" : "#7F8487"}
      />
    ),
  },
  {
    name: screens.Payment,
    focusedRoute: screens.PaymentNavigator,
    title: "Payment",
    showInTab: true,
    showInDrawer: false,
    icon: (focused) => (
      <MaterialIcons
        name="payment"
        size={24}
        color={focused ? "black" : "#7F8487"}
      />
    ),
  },
  {
    name: screens.PaymentNavigator,
    focusedRoute: screens.PaymentNavigator,
    title: "Payment",
    showInTab: true,
    showInDrawer: false,
    icon: (focused) => (
      <MaterialIcons
        name="payment"
        size={24}
        color={focused ? "black" : "#7F8487"}
      />
    ),
  },
  {
    name: screens.Settings,
    focusedRoute: screens.SettingsNavigator,
    title: "Settings",
    showInTab: false,
    showInDrawer: false,
  },
  {
    name: screens.SettingsNavigator,
    focusedRoute: screens.SettingsNavigator,
    title: "Settings",
    showInTab: false,
    showInDrawer: true,
  },
  {
    name: screens.Privacy,
    focusedRoute: screens.PrivacyNavigator,
    title: "Privacy",
    showInTab: false,
    showInDrawer: false,
  },
  {
    name: screens.PrivacyNavigator,
    focusedRoute: screens.PrivacyNavigator,
    title: "Privacy",
    showInTab: false,
    showInDrawer: true,
  },
];
Now let's use these screens and routes in our BottomTabNavigator.js file
We will introduce the other two routes present in the drawe screen (Settings and Profile) as earlier mentioned and create a bottomTabOptions function which will render only the screens we have declared to be true in showInTab.
import React from "react";
import { Text, View } from "react-native";
import { createBottomTabNavigator } from "@react-navigation/bottom-tabs";
import HomeNavigator from "../screens/DrawerTabScreens/HomeNavigator";
import ShopNavigator from "../screens/BottomTabScreens/Shop";
import PaymentNavigator from "../screens/BottomTabScreens/Payment";
import ExploreNavigator from "../screens/BottomTabScreens/Explore";
import SettingsNavigator from "../screens/DrawerTabScreens/SettingsNavigator";
import PrivacyNavigator from "../screens/DrawerTabScreens/PrivacyNavigator";
import { routes, screens } from "./ScreenRoutes";

const Tab = createBottomTabNavigator();

const bottomTabOptions = ({ route }) => {
// getting the route object
  const item = routes.find((routeItem) => routeItem.name === route.name);


  if (!item.showInTab) {
    return {
      tabBarButton: () => <View style={{ width: 0 }} />, // if item.showInTab is false then we are using this view to hide it.
      headerShown: false,
      tabBarStyle: {
        backgroundColor: "lavender",
        paddingTop: 5,
      },
      title: item.title,
    };
  }

  return {
    title: item.title,
    headerShown: false,
    tabBarIcon: ({ focused }) => item.icon(focused),
  };
};

const BottomTabNavigator = () => {
  return (
    <Tab.Navigator screenOptions={bottomTabOptions}>
      <Tab.Screen
        name={screens.HomeNavigator}
        component={HomeNavigator}
      />
      <Tab.Screen
        name={screens.ShopNavigator}
        component={ShopNavigator}
      />
      <Tab.Screen
        name={screens.ExploreNavigator}
        component={ExploreNavigator}
      />
      <Tab.Screen
        name={screens.PaymentNavigator}
        component={PaymentNavigator}


      {/* drawer routes */}
      <Tab.Screen
        name={screens.SettingsNavigator}
        component={SettingsNavigator}
      />
      <Tab.Screen
        name={screens.PrivacyNavigator}
        component={PrivacyNavigator}
      />
    </Tab.Navigator>
  );
};

export default BottomTabNavigator;
We are using the !item.showInTab to check for the falsy value from what we have declared in the routes of the ScreenRoutes.js file. Notice how we are now rendering the name of our Tab.Screen dynamically.
Now we make the final changes in the DrawerNavigator.js file.
Here we will be making use of the CustomDrawerContent to render the content of our drawer navigator.
drawerContent is a Function that returns React element to render as the content of the drawer, for example, navigation items
You can learn more about the custom drawer component from the docs here
import React from "react";
import { Text } from "react-native";
import {
  createDrawerNavigator,
  DrawerContentScrollView,
  DrawerItem,
} from "@react-navigation/drawer";
import BottomTabNavigator from "./BottomTabNavigator";
import { routes, screens } from "./ScreenRoutes";

const Drawer = createDrawerNavigator();

const CustomDrawerContent = (props) => {
  return (
    <DrawerContentScrollView {...props}>
      {routes
        .filter((route) => route.showInDrawer)
        .map((route, index) => {
          return (
            <DrawerItem
              key={index}
              label={() => (
                <Text style={{ fontSize: 18, fontWeight: "bold" }}>
                  {route.title}
                </Text>
              )}
              onPress={() => props.navigation.navigate(route.name)}
            />
          );
        })}
    </DrawerContentScrollView>
  );
};
const DrawerNavigator = () => {
  return (
    <Drawer.Navigator
      useLegacyImplementation
      screenOptions={{
        drawerType: "front",
      }}
      drawerContent={(props) => <CustomDrawerContent {...props} />}
    >
      <Drawer.Screen
        name={screens.HomeTabs}
        component={BottomTabNavigator}
        options={{
          title: "Home",
        }}
      />
    </Drawer.Navigator>
  );
};
export default DrawerNavigator;
The other two screens present in our Drawer.Navigator have been removed and we are rendering the content of our drawer using the CustomDrawerContent function where we are filtering the routes that has a truthy value of showInDrawer and then looping through the returned array to render the contents.
Now let's see the end result of what we have:
Conclusion
So, we have been able to implement a navigation whereby the bottom and drawer tab are visible on every screen/route and we have also make our screens and route dynamic. You can further make your own customization of this code to suit your preference.
You can find the complete code here on my github repo
Function that returns React element to render as the content of the drawer, for example, navigation items
Debugging
- Reanimated 2 failed to create a worklet, maybe you forgot to add Reanimated's babel plugin?
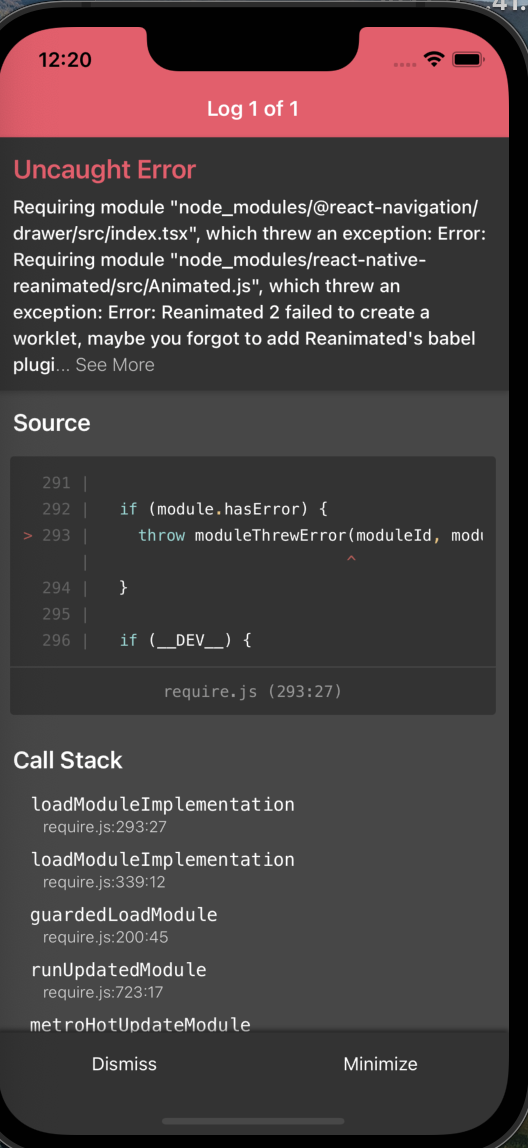
This is an error I first encountered due to the installation of react-native-gesture-handler and react-native-reanimated. This is needed for the drawer navigation as was mentioned on the official documentation.
Solution
You need to update your babel.config.js with this plugin:
plugins: [
    "react-native-reanimated/plugin",
  ],
Then stop your server and clear the cache using the command expo r -c and the error will be resolved.
- If you check our drawer slider, you will see that when we click the menu button to slide the drawer it does not slide properly. To fix this you can attach this code to the screen options of the
DrawerNavigator:
 <Drawer.Navigator
      useLegacyImplementation
      screenOptions={{
        drawerType: "front",
      }}
/>


